Enscape Accounts
Enscape Accounts
Overview
Within your Enscape Accounts page you have the possibility to view and manage your licenses, view the usage data of your floating licenses, your invoices, add or edit your payment methods, make immediate payments against outstanding invoices, order and filter your subscriptions, as well as download individual invoices as .pdf or add a PO number to each invoice manually.
You can log in to your Enscape Account by clicking the button on the Enscape website top menu that is highlighted in the following screenshot.
The Trial version has a 14-day limited License associated with the machine fingerprint directly, i.e., it does not require a License Key. Educational License Key holders should refer to the Educational License page if any assistance with License Keys is required.
NOTE: Account admins can also use Enscape like other listed users, by opening the Enscape Account ![]() window via the Enscape ribbon in CAD.
window via the Enscape ribbon in CAD.

Where to find the Enscape Account Login button
You can also directly log in to your Enscape Account via our website here.
Enscape Account Menu

Inside an Enscape Account with the various options in the menu seen at the right of the screen
Menu options within the License Center
Here’s a breakdown of the Enscape Account menu options that are available to an account administrator.
- Under the Subscriptions option you can view and edit your current licenses, view the usage data of floating licenses and retrieve your license keys.
- The User Management option you can add users via email invitation so they can be assigned access to license keys.
- Uploads allows a user to manage access to Panoramas and Web Standalone files.
- Under the Invoices option your current invoices as well as the corresponding payment status and open balance can be found.
- Adjust your contact data within the Profile option. This includes name, address, email, country, telephone number and VAT ID.
- Login Credentials (password) for your Enscape Account can be changed with this option.
- Add or edit your payment option in the Payment Method tab
Subscriptions
The Subscription tab gives you an overview of all your current subscriptions such as:
- The Licensing option
- The amount of seats and/or subscriptions linked to a license key
- Upcoming renewal dates
- Auto-Renewal Status

Inside the Subscriptions section
Hovering over the Key symbol will display the corresponding license key, which you can copy to your clipboard.

Copying the License Key
The usage data of floating licenses can be viewed via the Stats button where you can choose to view data for the last 24 hours, 7 days, 30 days, or 180 days. There is also a button here to download the data as *.csv file.

Usage Data Reports
Selecting Disable Auto-Renew will turn off the automatic renewal for your subscription.

Disable Auto-Renew Subscription
You still have the possibility to Enable Auto-Renew to your subscription within the active license period.

Enable Auto-Renew Subscription
Invoices
The Invoices section allows you to get an overview of your account as well as the payment status of your current and past invoices. You can search by Invoice number, as well as filter and order your invoices by:
- Status
- Issue Date
- Due Date
Additionally, you can click the individual column headers to sort your invoices by the selected attribute.
You can also download individual invoices as PDF via the arrow button associated with each listed Invoice, as well as manually add a Payment Order number (PO) to each invoice via the PO NUMBER button. On top of that, you can export the entire table of invoices to a .CSV file.
You can review your total outstanding amount, choose to pay all in one go, and review any available unapplied credits.
Furthermore, you have the option to select any number of outstanding invoices as part payment.

Invoices listed with associated details
With the Outstanding Balance field, you can see what total invoice amount is currently open. The Outstanding Balance shows the sum of all unpaid invoices.
In addition to the existing automatic payment of invoices, it is possible to pay all or individual invoices manually. To pay all outstanding amount at once, simply click on the “Pay All” button.
To pay off individual invoices that are outstanding, place a tick in the checkbox next to those invoices that are listed in red (those listed with red text are the outstanding invoices). Once you place a check next to an invoice, a Pay Now button will appear at the bottom right of the screen and will include the total sum of the invoices you have selected to settle.

Part Payment of Outstanding Invoices
Clicking the Pay Now button will result in an overlay appearing to the right of the screen which will show your Billing Information, the selected Invoices you are about to settle, along with the Total amount as well as the Payment Method. If you are happy to proceed, then click the orange Pay button to confirm payment.

Confirmation of your Billing Information, Total amount you will pay, and Payment Method
Once that payment has been processed, you will be provided confirmation included the total amount that was paid, as well as the option to immediately download the associated Payment Invoice. Although, Invoices are always available in the Invoice area of your Enscape Account.

Confirmation that payment was successful
Click the Close Payment button to close the overlay and return to the Enscape Account pages.
- Available Unapplied Credit:
Sometimes it can happen that you have a credit on your account which is not directly applied to an invoice, for example due to an incorrect bankwire. If this is the case, your credit will be shown in the “Available Unapplied Credit Memo” area. To apply available credit just contact our Licensing team by clicking on the orange “Contact” button which you can find in the lower right corner of this area.
Profile
View or adjust your billing address within the Profile page.
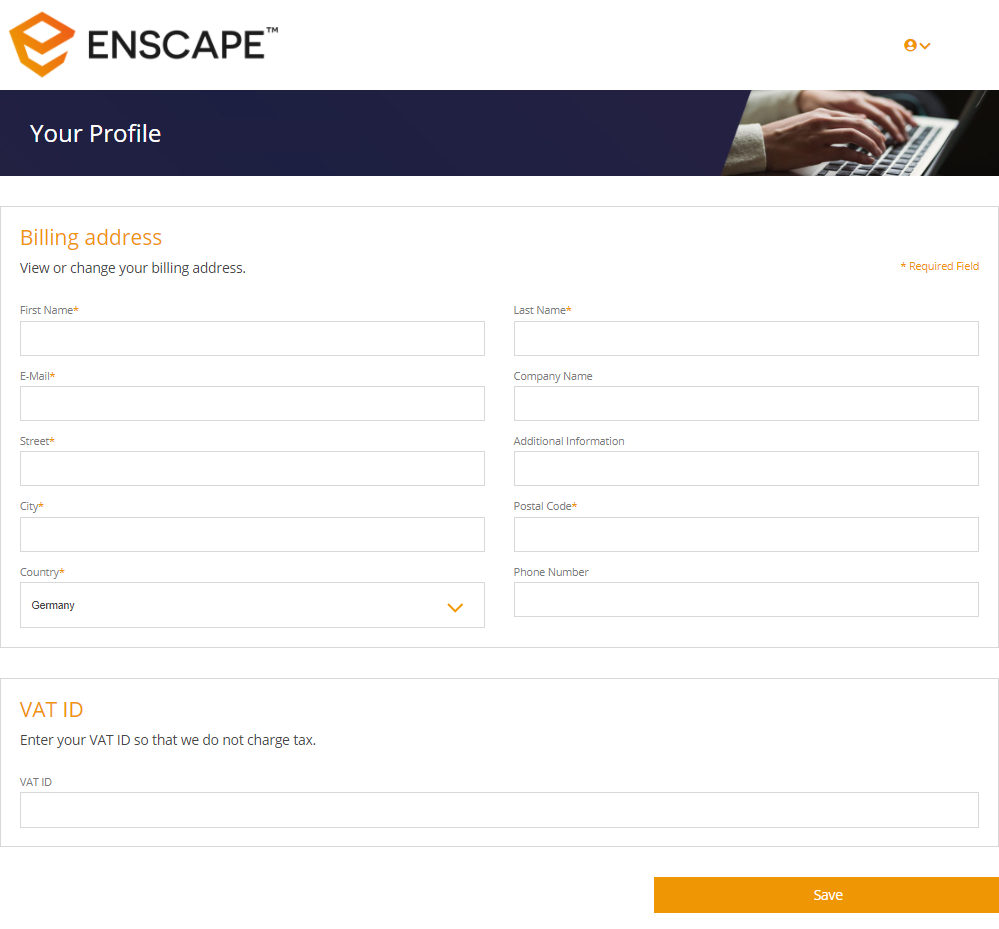
Profile page options
Payment Method
Under the Payment option you can adjust the payment method of your choice, from Credit Card and Direct Debit to Paypal.
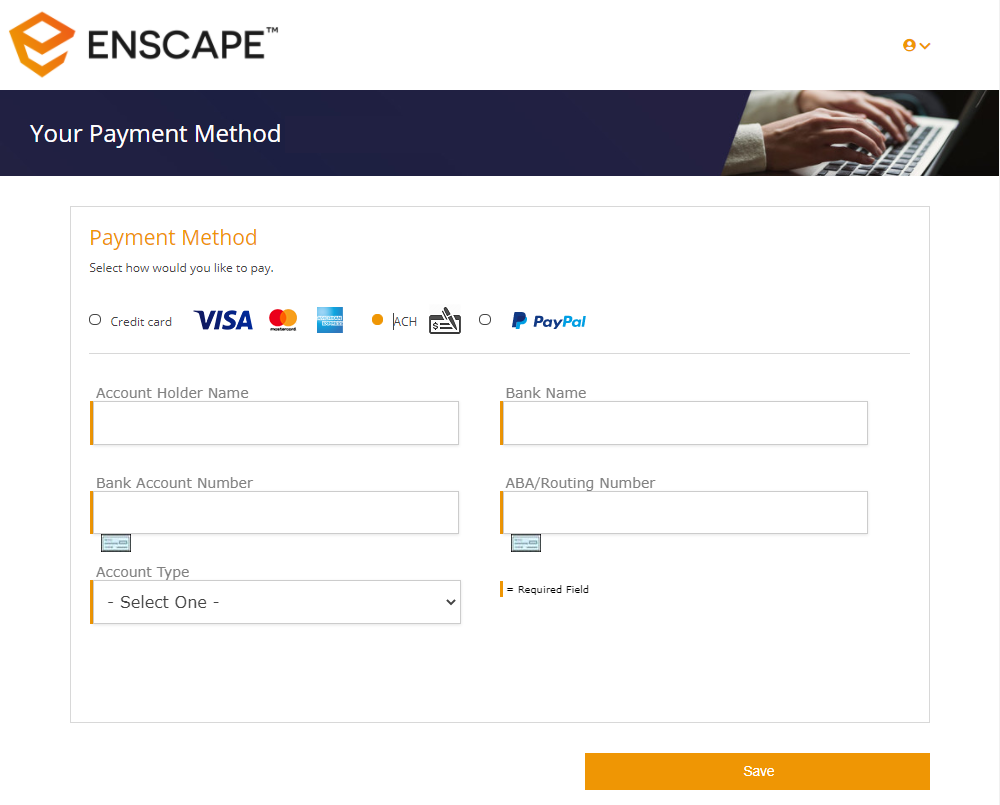
Payment Method
User Management
User Management allows the license administrator to Add New users and Invite them to be able to use Enscape by assigning them access to a License Key. New users will also be able to manage uploads once they have been successfully added. Simply click the Add New button on top left of your User Management section.

Add New user(s)
Once clicked, you will be able to see the input field with an Invite button next to it. You can add users by inserting their email addresses in the input field. Once filled in, just click Invite and the respective user will be added to your list of users.
Batch user account creation
If you have a list of emails in e.g. Excel and would like to add them as new users in Enscape, follow these simple steps:
1. Organize emails in a spreadsheet
2. Replace “.com” with “.com,” (notice the comma after the .com)
3. Select all emails and Copy them to the clipboard
4. Paste all emails into the Enscape portal (The format is also displayed in the input field)
Once filled in, just click Invite and the respective users will be added to your list of users.
If you receive an error or are not able to add a user, please contact us here.

Invite user(s)
Once the user has been invited, they will receive an email containing a link to allow them to set a password. Once that has been done the user will appear in the list of users under the User Management page, where the administrator can then assign access to a specific Enscape License Key. Each user is listed under their associated email, along with the number of licenses allocated to that user, as well as the current status of the user.
Users can be deleted altogether via the trash can icon and licenses revoked via the checkbox next to each subscription number. Deleting a user is a command for server to notify the user via an initial email warning that the account will be deleted in 14 days. If the user doesn’t cancel the deletion in the following 14 days, they will receive an email informing them their account has now been deleted. Users holding a fixed-seat license will be required to manually remove the license key from their machine.
In a case where a user is deleted and the license rights removed, or if a user lost access to their machine, the deletion of Panoramas from that user account can be requested by the account admin using our contact form.

Inside the User Management section
Once the user is added to the list and a license is assigned, they can then log in to the associated account via the Enscape Account -> Account option by filling in the login details and clicking Login. The License details will appear in the Licenses section and Enscape will be unlocked for that user.

User Account login in the Enscape Account window
License Types
A Fixed-Seat License is a license that is fixed to one machine at a time. You can easily transfer a fixed-seat license, by manually revoking it from a computer, and activating it on another one.
A Floating License can be activated using the license key on as many systems you want. Whenever you open Enscape, 1 seat is filled, up to a maximum of the number of seats you purchase. The seat is freed as soon as you close the Enscape window. For a floating license, the total number of machines that use Enscape at a time must be equal or less than the number of seats you own. When there is no seat available all core features of Enscape are blocked and a notification is displayed.
NOTE: The Fixed-seat and the Floating license will provide you with the same set of features in Enscape regardless of the license type.
Purchasing a new Subscription with a new License Key
Should you require a complete new license with a new license key, simply select the New Key button inside of the subscription view.

Purchase a new Subscription with a new License Key
A view will pop up, where you can select which kind of new license you wish to purchase.
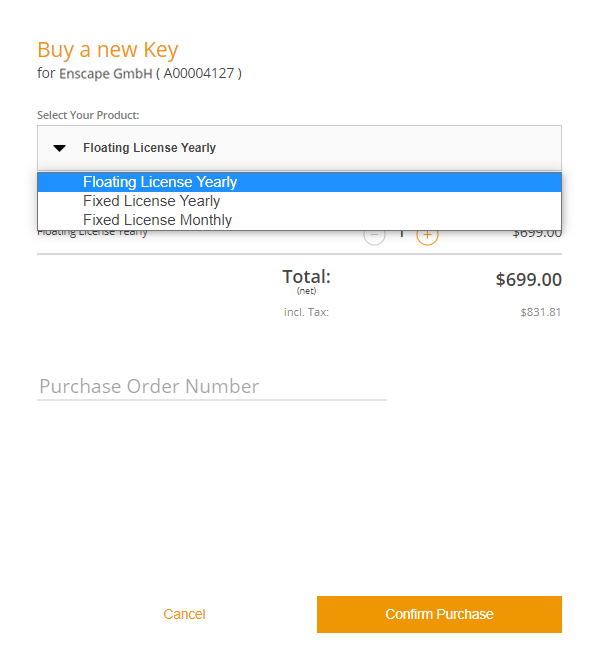
Select the License type
After selecting the licensing option, you can choose how many seats the new license key shall contain. This will define, how many concurrent users can have access to Enscape or on how many machines the license key can be activated.
If you want to conclude the purchase, simply click on the Confirm Purchase button to proceed.
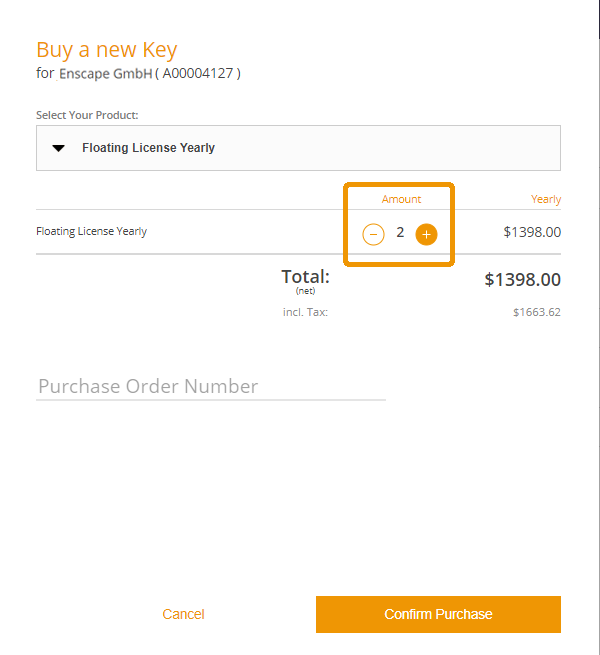
Specify the number of seats
As soon as the purchase is complete, you will be redirected to the subscription page where your new subscription and the corresponding new license key will be displayed.

Purchase Confirmation
Add a Seat to an Existing Subscription
This option will add the desired amount of seats to an existing subscription and its corresponding license key. The duration of the additional seats will be aligned with the current renewal date. In other words it will be prorated.
- Attention: This option is disabled for subscriptions purchased via resellers. In this case, we recommend the following options:
- Add your seat(s) in form of a new subscription
- Send your request to the reseller of your choice or contact us using the contact form.
To add a seat to an already existing subscription, simply click on the Plus button up to the desired amount of seats you require.

Increase number of seats in an existing floating license
Then select Update that will appear when you start to add new seats.

Make sure to enable the seat purchase via the Update button
A new view will show up where you can verify the amount of seats you wish to add and confirm your purchase.
Important: The price for the new seats will be prorated according to the remaining days until the next renewal date.
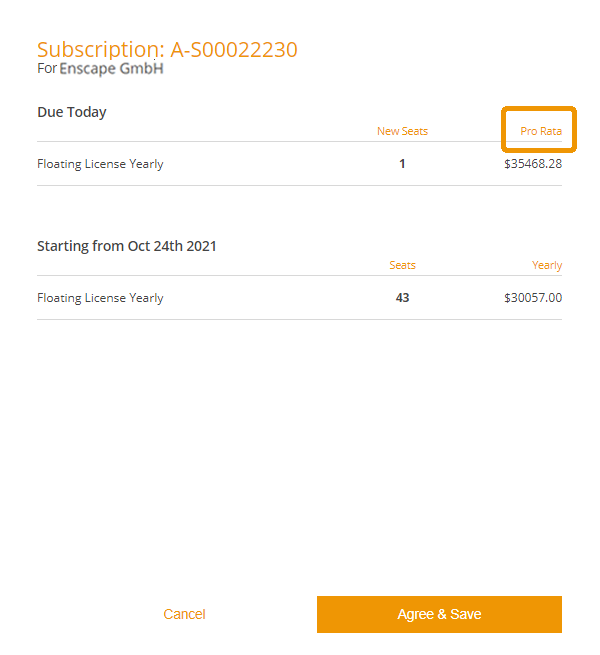
Adjusted billing according to time remaining to next renewal date
As soon as the purchase has been processed successfully, the additional license seats will be active and accessible.

Additional seats are now shown in the Enscape Account Subscription section
Add a new Subscription to an existing License Key
This option will add a new seat(s) to an existing license key in form of a new subscription. This subscription will have an individual duration of a year or a month starting from the date of the purchase.
To add a new subscription to your license key, simply select the Add Subscription to this Key button.

Add subscription to the License Key
A new view will show up, where you can choose how many seats you wish to add to this subscription.
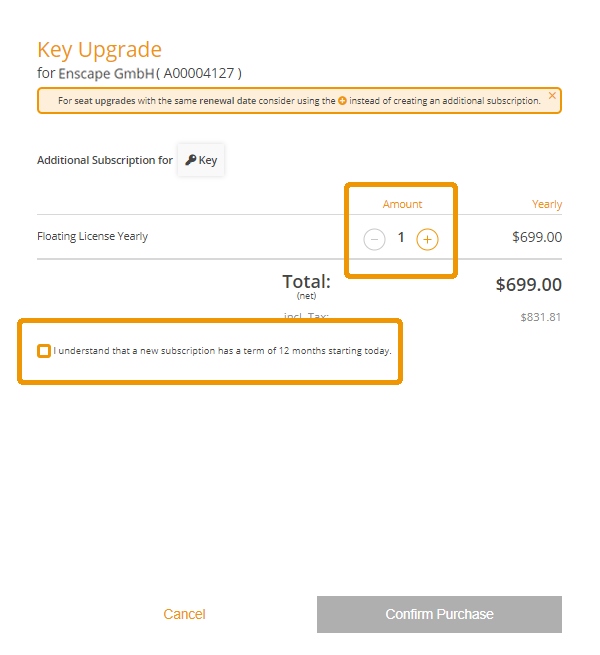
Adding further seats to a Subscription
You will need to make sure you have checked the box next to the line ‘I understand that a new subscription has a term of…….’, after which the Confirm Purchase button will turn orange and become available, so click on it and you will be forwarded to your subscription view again, where the new subscription for your license key will be displayed.

The new subscription is now displayed for your license key
The changes will be effective immediately and you can directly access the new seats.
For further questions, don’t hesitate to contact us via the contact form.

